Showing posts with label crafted with nuts and or seeds. Show all posts

Tuesday, October 18, 2011

string a few dangling nut head people

Nut head dolls, strung seed bodies
by kathy grimm.
Brief Description:
These dangling nut head dolls were made from natural materials. I loved to spend time with my children gathering from the wooded areas during a Fall walks. This craft brings back to mind fond memories. Natalie helped me collect the acorns yesterday and then I strung these dolls together on my own. Had she still been a little girl, this activity would have elicited much excitement. I think that should she ever have little ones of her own, she will enjoy the project again someday.

Supply List:
  • a handful of small wooden beads
  • two acorns, include their caps
  • dental floss
  • an embroidery needle, not too large (some of these have blunt ends more suitably designed for young crafters)
  • wood glue as needed
  • soft bristle tooth-brush
Directions:
  1.  Clean and dry all to the seeds and nuts that you have collected in advance with a soft tooth brush. I have already included directions in an earlier project that explain how to string pumpkin seeds.
  2. I decided to string together my selection in a pattern. This reinforces important concepts about design to small students. You can also talk to them about simple math during this activity as well.
  3. Thread your needle with dental floss and string together the bodies.
  4. I attached the acorn heads with wood glue after stringing the bodies. Parents may decide that this requires a bit of patience. They may wish to hot glue the acorns to the seed bodies instead so that there is less drying time needed before the project is finished. Sometimes little folk get very anxious about playing with these nut head dolls so, parents may hurry the craft along in order to please their interests.
  5. A word of warning. Do not give these little dolls to infants who may choke on the nuts! This project is appropriate for five year old children and up.
Additional Suggestions: Sometimes parents get interested in crafts that they intend for their children. This is often the case in the making of nut head dolls! So harvest enough seeds and nuts to make a few for yourself. I enjoy hanging my own samples on the Christmas tree every year. This is, in fact, a very old folksy tradition. Craft artists living in the Appalachian mountains used to make this kind of folk doll to sell to tourists. It was a popular craft around 1910. I still can find nut head dolls in flee markets on a rare occasion.

The nut head people finally rest after I have spent an
hour in the park looking for their heads.

I chose to string these dangling nut people with a
variety of pumpkin seeds, wooden beads, and acorns.

Friday, October 14, 2011

decoupage a seed and bean abstract mosaic

A teachers sample of an abstract bean mosaic.
Brief Description: Seed and bean mosaics seem to go in and out of fashion. This simple craft can be used to teach young students about the qualities of texture and design at very little expense to the teacher, camp director, or an art department.

Supply List:
  • A heavy duty piece of cardboard or inexpensive Masonite, or recycled sheet of pressed wood
  • either wood glue or white school glue
  • pencil
  • Mod Podge
  • A wide assortment of seeds, beans, rice, nuts, and or dried items may be collected; I've listed specific varieties below.
Suggested dried beans, seeds and rice available at your local grocery store: Red beans, Kidney beans, Black beans, Anasazi beans, Sunflower seeds, White rice, Brown rice, Pumpkin seeds, Melon seeds, Black eyed peas, Green split peas, Yellow split peas,  Navy beans, Pinto beans, Wild rice, Indian corn, Lentils, Grass seed,
Suggested dried materials available at your local florist, hobby outlet, or even outside in your own backyard: Devils claw, Wheat stalks, Money plant, Sponge Mushroom, Pomegrante, Lotus Pods, Okra Pods, King Cobra Bark, Pod Oars, Pinecones, Acorns, Hazelnuts, Walnuts
Directions:
  1. Draw a design on your cardboard or wood board
  2. Glue the dried materials down with either wood glue or white glue
  3. After the glue has dried, completely cover the entire surface with Mod Podge in order to seal it properly.

These dried beans were purchased at a local grocery store.

Photograph of my abstract, bean mosaic up close.

string a necklace made from seeds

The seed necklace above is from Mexico.

Brief Description: Stringing seeds to create jewelry and garlands is done by many different cultures of peoples. The seed necklace pictured here is from Mexico. However, native peoples in North America and many tribal peoples from Africa create similar crafts that also use the same methods. Seed necklaces are actually best strung while the seeds have not yet fully dried. This method makes it much easier for children to prick holes into the seed shells.


Supply List:
  •  A variety of seeds
  •  strong thin cord or dental floss for stringing
  •  An embroidery needle with a sharp tip
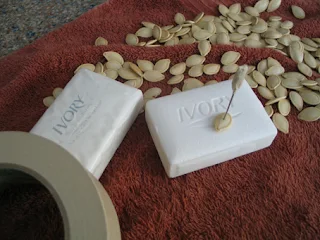
  •  one bar of ivory soap
  •  a soft terry cloth towel
  •  masking tape
  •  one small pumpkin
  •  one large metal spoon
  •  access to a wash basin or a large bucket of water
  •  knife to cut open the pumpkin
  •  liquid dish soap
Directions:
  1. Cut your pumpkin in half and hollow out it's interior with a large metal spoon.
  2. The seeds are easy to clean. Just soak them for a few minutes in the bucket of water and the pumpkin pulp with separate from the seeds with a little plucking on your part.
  3. Wash the seeds with a little liquid soap and then pat them down with a soft terry cloth towel.
  4. Wrap the dull end of your embroidery needle with a little masking tape, so that it will be easier to handle.
  5. Pierce each soft, pumpkin seed with a threaded needle.
  6. Use a bar of Ivory soap underneath your needle to keep it sharp and to avoid contact with surfaces or flesh.

A fresh pumpkin will provide ample seeds for a necklace or garland.
The best way to prevent cuts and pricks is to use a bar of ivory soap
to buffer the entire process of piercing seeds. Ivory soap is best because
it contains fewer of the dyes and perfumes that little ones could
possibly be allergic to.
Emilie Lefler shows you how to make seed bombs.

Links to more projects that include the use of seeds:

Wednesday, September 28, 2011

craft a walnut strawberry

This walnut strawberry will hang on somebody's
Christmas tree this year.
Brief Description: The first time I ever saw these walnut strawberries was in a magazine article about Victorian Christmas ornaments. Then, years later I found them again in a craft book about Mexican ornament making. So, I have no idea who thought of them first.

Supply List:
  • cleaned walnuts (preferably from the store)
  • red acrylic or red poster paint
  •  two colors of green scrap felt for the leafs
  • green string to match the felt
  • a black permanent ink, felt tip pen
  • a soft camel hair paint brush
  • a shallow dish of water or a clean jar of water for cleaning the brush
  • tacky white glue 
  • scissors
  • a large embroidery needle

Directions:
  1. Paint the entire surface of the walnut a pleasing red and set the nut aside to dry.
  2. After the walnut is completely dry, draw dots or short slashes with the permanent ink marker to mimic strawberry seeds.
  3. Download and print out our template for strawberry leaves. Size these in a Word document before printing.
  4. Place the pattern on top of the darker green felt scrap and cut out the bottom leaf, following the black outlined pattern.
  5. Place the pattern again on top of the lighter green felt scarp and cut out the top leaf, following the white outlined pattern.
  6. String both felt leaves together and tie also a large hoop for hanging. 
  7. Now glue the entire felt top to the top of the walnut using a tacky white glue.
  8. Apply a little pressure to the top while the glue is drying.

Additional Suggestions: The walnut "strawberry" may be painted a bit more elaborately by mixing a bit of white or orange to the the red paint as you apply it towards the top of the nut.

A strawberry leaf template.
This template may be downloaded and sized in a
word document. Read the Terms of Use before
using it folks.

All instructions, template and photographs copyrighted by Grimm 2011