Showing posts with label Food Crafts. Show all posts

Monday, April 10, 2017

sculpt a few tacos with papier-mâché

Finished papier-mâché pulp taco samples.
 
Brief Description: These tacos look good enough to eat. Save some clean tissues and bags from your real dinner some evening and wrap these up realistically for a little one to enjoy as a gift.

Supply List:
  • sturdy paper plates
  • newsprint
  • brown paper bag
  • masking tape
  • white school glue
  • red and brown acrylic paint
  • soft, small paint brush
  • papier-mâché pulp
  • shredded yellow and green papers 
  • Mod Podge
Directions:
  1. Cut off the rim of the number of plates you will need to make a handful of mouth watering tacos. 
  2. Crush some newsprint to sandwich between your faux shells and tape these in place.
  3. Now layer shredded brown paper along with white school glue all over the surface of your taco shapes. Cover the surface completely. Always end with the surface being covered with the white glue. Set aside the taco shapes to dry overnight.
  4.  Now prep the papier-mâché pulp according to the directions on the package. Spread it over the inside surface of the taco only to imitate the ground beef. Let this dry out; it must harden completely before continuing with the project.
  5. Paint  papier-mâché pulp brown for ground beef and red for sliced tomatoes. Let dry.
  6. Paste shredded paper to mimic shredded cheese and lettuce.
  7. Add a layer of Mod Podge to the entire surface of all tacos to preserve the work.
Left, tacos start out looking something like this, but, Right, in the end look more like something you could eat.
Cute fake food crafts from GuideCentral.

Sunday, April 2, 2017

handcraft your own artisan pizza

  I saved a real pizza box to store my pretend pizzas in.
Brief Description: These little pizzas are made entirely of paper. I made these samples for a child's kitchen playset. However, teachers may prefer to make larger versions for a fun classroom craft.

Six steps for making an artsy pizza.
Supply List:
  • sturdy paper plates
  • newsprint
  • brown paper bag
  • masking tape
  • white school glue
  • red and brown acrylic paint
  • soft, small paint brush
  • papier-mâché pulp
  • shredded yellow papers 
  • Mod Podge
Directions:
  1. Crush a long narrow strip of newsprint to form the edges of your pizza using masking tape to attach it to the outer rim of your stiff paper plate. Mask the entire plate with the tape.
  2. Cover the plate with white school glue and shredded brown paper sack paper. Cover the top layer of the paper with the same glue and let the pizza shape dray overnight. 
  3. Prep the papier-mâché pulp according to the directions found on the package. Ad a very then layer of this to the top of your pizza's surface only. 
  4. If you choose to make a sausage pizza, at this point you would need to make the surface of the pizza a bit lumpy with the papier-mâché pulp. Let the pizzas dry after this step. You may need to set them in the sunlight or near a warm air vent to speed up the drying time. Do not put them near an open flame! It may take a couple of days for the pulp to dry depending on the time of year or the climate in your environment.
  5. After your pizzas have hardened, you may paint the "saucy" papier-mâché area with a tomato red acrylic paint and if you have a sausage pizza, use a brown acrylic paint to color the raised areas of pulp brown. I cleaned up the edges of the sauce a bit by adding more glue and brown paper where I didn't want the red paint. Let this dry; it shouldn't take long.
  6. Drizzle the white glue on the top parts of the pizza where you would like to add cheese. I shredded several yellow papers in advance for this part of the craft. I used acid free papers because I wanted the colors of the cheese not to fade over time. You may use whatever paper you have at hand. Sprinkle the paper on top of the glue and add more layers of glue as you go. Finish the entire surface of the paper pizzas with Mod Podge at the end and let this dry. 
Here you can see up close the difference between the tomato sauce and the sausage on the surface of the pizzas.
Additional Suggestions: Try to shape all kids of veggies for you pizza with papier-mâché pulp and cut paper.

Saturday, April 1, 2017

shape a dozen papier-mâché doughnuts


Finished papier-mâché doughnuts. Some young person will enjoy playing with these.
Brief Description: There are many people both young and old, who enjoy crafting fauve foods. Every students can learn to craft papier-mâché doughnuts with just a few inexpensive supplies. Many crafters will probably have the majority of these supplies already in their possession. 
       Crafted foods make unique little gifts for the young child who loves to play house or who likes to pretend to sell things in a play marketplace. Once you get the hang of sculpting these baked goods, try shaping even more of your favorite foods. Before you know it, you'll have a whole kitchen full of these low fat, delicious, baked goods to share with friends and family!

Supply List:
  • brown paper bag
  • newsprint
  • masking tape
  • papier-mâché pulp
  • white school glue
  • acrylic paints
  • seed beeds
  • transparent glitter
  • soft, tiny paint brush
  • tin container and plastic lid (cleaned and recycled)
  • Modge Podge
Directions:
  1. Crush newsprint into long cylindrical shapes.
  2. Shape these into round refined doughnuts and then wrap the surfaces completely with masking tape.  (shown below)
  3. Apply white glue to the surface of the masked confections with your fingers and apply shredded brown paper on these surfaces.
  4. Let everything dry overnight. 
  5. Prepare the papier-mâché pulp as the instructions on the package state. Now apply a bit of the papier-mâché to the top of each doughnut till these look frosted.
  6. Let the donuts dry overnight again. 
  7. Paint the papier-mâché different colors with the acrylic paints; let this paint dry.
  8. Apply white glue or a tacky glue of some kind on top of the papier-mâché icing and sprinkle glitter or seed beads into the paste. Let it dry solid
  9. Apply a generous amount of Modge Podge to seal the doughnuts.
  10. After these dry, display them in a clean, dry recycled container. They make the perfect craft for little ones that like to play house!
Additional Suggestions: Your teens will love making papier-mâché food crafts giant sized. Hang these from the ceiling during a Pop Art unit/lesson.
These papier-mâché doughnuts are ready to ice and decorate.
Left, masked papier-mâché shapes. Right, papier-mâché
shapes covered with a layer of brown paper.

Larger papier-mâché doughnut pop art by the Electronic art room.
All instructions and photographs, templates are copyrighted by Grimm 2017

Friday, October 28, 2011

Cut and paste Halloween sucker sleeves

Construction paper samples of
the design templates below.

       These Halloween sucker sleeves will surely please any small student in your classroom this year. The Bats, owls, and even a friendly ghost are simple design templates that any student or teacher can trace, cut out and glue together. Add a few wiggly eyes and some delicious suckers too!

Supply List: black, white, and brown construction paper, white glue, stapler, suckers, templates, wiggly eyes, and scissors

Directions:
   1. Download the templates below, print and cut out the designs.
   2. Trace around the Halloween critters and cut out two of each design.
   3. Glue together a front and a back side for each design and let the glue dry completely before inserting a sucker. Leave the bottom edge of each design unpasted.
   4. Add additional trims like wiggly eyes, bows, silly expressions etc...
   5. Carefully insert the sucker up through the bottom edge of the design and staple it firmly in place.

Additional Suggestions: These patterns may also be crafted with felt and sewn together.
Friendly ghost for Halloween sucker sleeve template.
All of these templates may be downloaded and sized in a
word document to fit the above measurements.
Read the Terms of Use before using it folks.

Owl template for Halloween sucker sleeve.
Bat and moon template for Halloween sucker sleeve.

Kids can decorate their suckers for Halloween.
From Sugar Bee Crafts.

More Halloween Crafts:
All patterns and photographs by Grimm copyrighted 2024.

Friday, October 14, 2011

decoupage a seed and bean abstract mosaic

A teachers sample of an abstract bean mosaic.
Brief Description: Seed and bean mosaics seem to go in and out of fashion. This simple craft can be used to teach young students about the qualities of texture and design at very little expense to the teacher, camp director, or an art department.

Supply List:
  • A heavy duty piece of cardboard or inexpensive Masonite, or recycled sheet of pressed wood
  • either wood glue or white school glue
  • pencil
  • Mod Podge
  • A wide assortment of seeds, beans, rice, nuts, and or dried items may be collected; I've listed specific varieties below.
Suggested dried beans, seeds and rice available at your local grocery store: Red beans, Kidney beans, Black beans, Anasazi beans, Sunflower seeds, White rice, Brown rice, Pumpkin seeds, Melon seeds, Black eyed peas, Green split peas, Yellow split peas,  Navy beans, Pinto beans, Wild rice, Indian corn, Lentils, Grass seed,
Suggested dried materials available at your local florist, hobby outlet, or even outside in your own backyard: Devils claw, Wheat stalks, Money plant, Sponge Mushroom, Pomegrante, Lotus Pods, Okra Pods, King Cobra Bark, Pod Oars, Pinecones, Acorns, Hazelnuts, Walnuts
Directions:
  1. Draw a design on your cardboard or wood board
  2. Glue the dried materials down with either wood glue or white glue
  3. After the glue has dried, completely cover the entire surface with Mod Podge in order to seal it properly.

These dried beans were purchased at a local grocery store.

Photograph of my abstract, bean mosaic up close.

string a necklace made from seeds

The seed necklace above is from Mexico.

Brief Description: Stringing seeds to create jewelry and garlands is done by many different cultures of peoples. The seed necklace pictured here is from Mexico. However, native peoples in North America and many tribal peoples from Africa create similar crafts that also use the same methods. Seed necklaces are actually best strung while the seeds have not yet fully dried. This method makes it much easier for children to prick holes into the seed shells.


Supply List:
  •  A variety of seeds
  •  strong thin cord or dental floss for stringing
  •  An embroidery needle with a sharp tip
  •  one bar of ivory soap
  •  a soft terry cloth towel
  •  masking tape
  •  one small pumpkin
  •  one large metal spoon
  •  access to a wash basin or a large bucket of water
  •  knife to cut open the pumpkin
  •  liquid dish soap
Directions:
  1. Cut your pumpkin in half and hollow out it's interior with a large metal spoon.
  2. The seeds are easy to clean. Just soak them for a few minutes in the bucket of water and the pumpkin pulp with separate from the seeds with a little plucking on your part.
  3. Wash the seeds with a little liquid soap and then pat them down with a soft terry cloth towel.
  4. Wrap the dull end of your embroidery needle with a little masking tape, so that it will be easier to handle.
  5. Pierce each soft, pumpkin seed with a threaded needle.
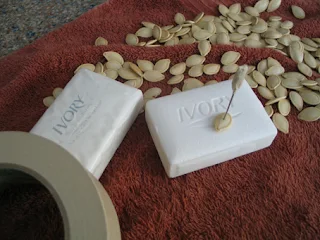
  6. Use a bar of Ivory soap underneath your needle to keep it sharp and to avoid contact with surfaces or flesh.

A fresh pumpkin will provide ample seeds for a necklace or garland.
The best way to prevent cuts and pricks is to use a bar of ivory soap
to buffer the entire process of piercing seeds. Ivory soap is best because
it contains fewer of the dyes and perfumes that little ones could
possibly be allergic to.
Emilie Lefler shows you how to make seed bombs.

Links to more projects that include the use of seeds:

Wednesday, September 28, 2011

craft a walnut strawberry

This walnut strawberry will hang on somebody's
Christmas tree this year.
Brief Description: The first time I ever saw these walnut strawberries was in a magazine article about Victorian Christmas ornaments. Then, years later I found them again in a craft book about Mexican ornament making. So, I have no idea who thought of them first.

Supply List:
  • cleaned walnuts (preferably from the store)
  • red acrylic or red poster paint
  •  two colors of green scrap felt for the leafs
  • green string to match the felt
  • a black permanent ink, felt tip pen
  • a soft camel hair paint brush
  • a shallow dish of water or a clean jar of water for cleaning the brush
  • tacky white glue 
  • scissors
  • a large embroidery needle

Directions:
  1. Paint the entire surface of the walnut a pleasing red and set the nut aside to dry.
  2. After the walnut is completely dry, draw dots or short slashes with the permanent ink marker to mimic strawberry seeds.
  3. Download and print out our template for strawberry leaves. Size these in a Word document before printing.
  4. Place the pattern on top of the darker green felt scrap and cut out the bottom leaf, following the black outlined pattern.
  5. Place the pattern again on top of the lighter green felt scarp and cut out the top leaf, following the white outlined pattern.
  6. String both felt leaves together and tie also a large hoop for hanging. 
  7. Now glue the entire felt top to the top of the walnut using a tacky white glue.
  8. Apply a little pressure to the top while the glue is drying.

Additional Suggestions: The walnut "strawberry" may be painted a bit more elaborately by mixing a bit of white or orange to the the red paint as you apply it towards the top of the nut.

A strawberry leaf template.
This template may be downloaded and sized in a
word document. Read the Terms of Use before
using it folks.

All instructions, template and photographs copyrighted by Grimm 2011

Friday, September 23, 2011

cut sucker sleeves from outer space!


A rocket sucker sleeve decorated with
shiny foil paper and stuffed
with a lemon flavored sucker.
Brief Description: Sucker sleeves "dress up" party favors for classroom parties. When I was very young, if you received a valentine with a sucker attached to it, you were considered a great friend. Not every package of student valentines included more than just a few sucker sleeves with a bonus treat.

Supply List:
  • a variety of construction paper
  • tin foils or other alternative shiny papers
  • white glue
  • black permanent ink marker, thin tipped
  • scissors
  • sucker sleeve templates
  • stapler
  • suckers, of course
Directions:
  1. Cut out the templates and trace around these on top of the construction papers.
  2. Cut out and glue together the patterns according to your own tastes. You may choose to use tin foils for the spaceships as well.
  3. Use permanent black markers to draw on top of the tin foil. This will keep the ink from rubbing off onto clothing and table surfaces. This ink does bleed, however, so remember to keep your work surfaces padded with old newspapers.
  4. Glue around the edges of your front template and then adhere the back template into place. Let this glue dry before stuffing the sucker sleeve with a piece of candy.
  5. After stuffing the candy sleeve, you may need to add a few staples to keep the sucker from falling out of it's wrapper.
Additional Suggestions: Teachers and/or camp crafters may elect not to cut and paste these candy wrappers with fancy papers. Small ones would probably be just as happy to color in the templates with colored markers or crayons.
The back side of our rocket sucker sleeve.
Teachers may choose to give students some
shiny tin foil to craft a more realistic
spaceship or rocket!
A sample of a submarine sucker sleeve
colored with a bright yellow marker and
stuffed with a sour cherry sucker
The rocket ship sucker sleeve template.
The submarine sucker sleeve template.
The spaceship sucker sleeve template.
This template may be downloaded and sized in a
word document to fit the above measurements.
Read the Terms of Use before using it folks.

All patterns and photographs by Grimm copyrighted 2011.

cut and paste treasure chest candy wrappers

Treat your pirate to Palmer chocolate,
gold coins packaged in our treasure chest candy wrapper!
Brief Description: These little paper treasure chests are easy and inexpensive to make. They make the perfect candy favors for a birthday party or holiday celebration. 

Supply List:
  • one sheet of brown construction paper
  • black ink pen
  • silver ink pen
  • scissors
  • white glue
  • one netted package of Palmer, gold, chocolate coins ( there are other brands of chocolate coins sold in the U.K.)
  • pattern for the candy wrapper provided below.
Directions:
  1. Print and cut out the templates
  2. Trace one of each onto a sheet of brown construction paper.
  3. Cut out the patterns and fold/cut where indicated on the pattern.
  4. Glue just the out edges only of the back of the treasure chest and adhere this to the front.
  5. Color the candy wrapper with black and silver ink as I have shown here in my pictures.
Don't forget to decorate the inside
of the candy wrapper as well
The backside view of our treasure chest
A treasure chest candy wrapper template.
This template may be downloaded and sized in a
word document to fit the above measurements.
Read the Terms of Use before using it folks.
All patterns and photographs by Grimm copyrighted 2011.

Read more about "How to host a vintage pirate party" at Thrifty Scissors.