Saturday, March 26, 2011

maori design lesson plan


(Teacher’s sample design copyrighted 2011 Grimm)

Title: Maori Design
Topic: indigenous cultural design
Goals and Objectives:
  • Students will demonstrate how to use designs from alternative cultures to inspire an original artwork assigned to them in class.
  • Students will use pattern and a color scheme to create a rhythmic design.
GLEs:
STRAND I: Product/Performance
3. Communicate ideas about subject matter and themes in artworks created for various purposes
A. High School Level I
  •      Create original artworks using non-objective, architecture and anatomy subject matters.
STRAND IV: Interdisciplinary Connections (IC)
1. Explain connections between visual art and performing arts
A. High School Level I
·      Connect meanings of elements in art with terms in music, theatre, or dance
STRAND II: Elements and Principles (EP)
2. Select and use principles of art for their effect in communicating ideas through artwork
D. Rhythm/Repetition: High School Level I
·      Identify and use elements to create regular rhythm
STRAND II: Elements and Principles (EP)
2. Select and use principles of art for their effect in communicating ideas through artwork
A. Balance: High School Level I
·      Differentiate among and use symmetrical (formal), asymmetrical (informal), and radial balance
STRAND II: Elements and Principles (EP)
1. Select and use elements of art for their effect in communicating ideas through artwork
E. Color: High School Level I
·      Identify and use color theory including color value, and color schemes (analogous, monochromatic, and complementary)
STRAND II: Elements and Principles (EP)
1. Select and use elements of art for their effect in communicating ideas through artwork
B. Shapes: High School Level I
·      Differentiate between and use geometric and organic (freeform) shapes
STRAND II: Elements and Principles (EP)
1. Select and use elements of art for their effect in communicating ideas through artwork
A. Line: High School Level I
·      Identify and use weighted contour, parallel, and perpendicular lines
STRAND III: Artistic Perceptions (AP)
2. Analyze and evaluate art using art vocabulary
A. Art Criticism: High School Level I: With one artwork:
·      describe artwork;
  • analyze the use of elements and principles in the work;
  • Interpret the meaning of the work (subject, theme, symbolism, message communicated);
  • Judge the work from various perspectives:
  • Showing a real or idealized image of life (Imitationalism)
  • Expressing feelings (Emotionalism/ Expressionism)
  • Emphasis on elements and principles (Formalism)
  • Serving a purpose in the society or culture (Functionalism)
Grade: 9th – 12th
Length of Class Period: 55 minutes
Frequency of Class Period: five days a week
Time Needed: four class periods
Facility & Equipment Requirements:
  • One computer lap top
  • Room with good lighting
  • Large tables, approximately ten, each seating four students
  • Two sinks
  • Dry erase board
  • Drying racks
  • Cabinets for storage
  • Projector for viewing computer video, CDs and DVDs
Resources Needed:
  • Power Point About Maori Design/Symbols
  • Maori Symbols worksheet
Maori Symbols worksheet
Materials Per Student:
  •      White drawing paper and markers
Vocabulary/Terminology:
  1. Koru – peace, tranquility and personal growth
  2. Toki –are objects worn by elder Maori that  symbolize power and wisdom
  3. Kowhaiwhai – is the pattern that distinguishes the tribe a particular Maori is from
  4.  Manaia – is a spiritual guardian
  5. Tiki – a good luck charm and symbolic for fertility
  6. Roimata – a teardrop that symbolizes comfort
  7. Hei Matau – a fish hook
  8. The Circle of Life – represents that life in general has no beginning or ending point that people can prevent from happening. Life and death are inevitable.
  9. Maori – the indigenous peoples of New Zealand
Motivation- Looking and Talking Activity: Students will watch several youtube videos of the Maori chants used in modern day soccer tournaments and also performed by descendents of the Maori at their national culture center.
Step-by-Step Studio Activity Specifics:
  • Students will first view the short films about Maori chants. These films stress the concept of using a cultural practice derivative of one specific group to influence the practices of another. These influences are based in design only and do not require students to produce exact images of that which they do not feel comfortable with or believe in personally.
  • Students will then be handed a Maori symbols worksheet and view a Power Point presentation that goes along with it.
  • Students will design their own original motif using design elements found in the Maori culture. These elements are spiral in nature and come from the plant life/sea life of their island home.
  • Students will need to select one of the following color schemes to illustrate their design ideas: complimentary, split complimentary, neutral, monochromatic, secondary or primary.
  • Students will create their final design version using colored felt tip ink pens.
Health & Safety Concerns: There are no health and safety concerns for this project.
Cleanup Time & Strategy: Students will be instructed to put away art materials neatly in their containers, clean off their tables, and recycle their trash two minutes prior to dismissal.
Assessment: A formal assessment/grading rubric sheet is included along with this lesson plan.

All photos and lesson plans copyrighted 2011 Grimm
 

Wednesday, March 23, 2011

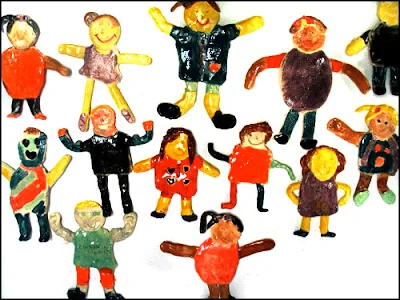
ceramic lesson plan: clay slab people

(Clay slab people by 4th and 5th graders)

Title: Clay Slab People
Topic: learning to work with clay
Objectives & Goals:
  • Students will demonstrate slab-building techniques while working with clay.
  • Students will participate with their peers in a procedure known as cubing in order to examine thoroughly a selected topic in six dimensions.
GLEs:
Strand I: Product/Performance for Sculpture, Ceramics, Other Media
A.2. Select and apply three-dimensional media, techniques, and processes to communicate ideas and solve challenging visual art  problems.
Grade 4 - Build or layer materials to create a relief, Apply a variety of paper folding techniques, Modeling with clay or a similar material;,Make organic forms
Grade 5 - Combine simple forms to create a complex object/form (in-the-round), Use paper joining techniques such as tabs and slits, Modeling with clay or a similar material:, Build a form using a coil techniques
Strand II: Elements and Principles – Form
C. 1. Select and use elements of art for their effect in communicating ideas through artwork.
Grade 4 - Identify and demonstrate relief sculpture, Identify and use organic form
Grade 5 - Identify and use the illusion of form: cube, sphere, cylinder, and cone
Strand I: Product/Performance for Theme
C.3. Communicate ideas about subject matter and themes in artworks created for various purposes.
Grade 4 - Create an original artwork that communicates ideas about the following themes:
· Missouri
· The Environment
· Time (e.g., past, present, future)
Grade 5 - Create an original artwork that communicates ideas about the following themes:
· United States
· Patriotism
· World
· Time (e.g., past, present, future)
Grade: 4th and 5th
Length of Class Period: 55 min.
Frequency of Class Period: once a week
Time Needed: two class periods
Facility & Equipment Requirements:
  • One computer lap top
  • Room with good lighting
  • Large tables, approximately ten, each seating four students
  • Two sinks
  • Dry erase board
  • Drying racks
  • Cabinets for storage
  • Projector for viewing computer video, CDs and DVDs
  • Kiln for firing porcelain clay figures
Resources Needed:
  • Power Point about building a clay slab figure
  • “The Pot That Juan Built,” by Nancy Andrews-Goebel
Materials Per Student for Looking and Talking Activity/Cubing: 
  • Each small group receives one sheet of paper with a label on it. The six labels are as follows: Describe, Compare, Associate, Analyze, Apply or Argue.
Materials Per Student For Studio Project:
  • One round ball of porcelain clay measuring four inches in diameter.
  • One roughly cut mat made from burlap
  • One small shallow plastic tray of water
  • A pencil for scoring
  • An egg carton with a variety of glazes for painting with. (one egg carton per every four pupils)
Vocabulary/Terminology:
  1. pinch - to form clay between the fingers and the palm
  2. coil - a rope-like formation of clay
  3. slab - a evenly rolled or pressed layer of clay
  4. bisque - is clay that has been fired but not yet glazed
  5. ceramics - are objects created from stoneware, porcelain or terra cotta
  6. clay - soil, water and sand
  7. fire - is the name for the heat that is used in a kiln
  8. glaze - a glass paint used on pottery
  9. kiln - a special oven used for hardening clay
  10. greenware - pottery that is not yet fired in a kiln
  11. leather hard - the hard condition of clay when it is almost air-dry
  12. score - roughen the clay's surface so that a bond may be formed between two surfaces
  13. sculpture - a three-dimensional art work
  14. slip - a liquid clay used to glue two pieces together
  15. texture - press into the clay surface with objects to create a pattern, design or rough surface


Motivation- Looking and Talking Activity: This activity will last the entire first day of the lesson plan. After I read aloud, “The Pot That Juan Built,” by Nancy Andrews-Goebel, the class will learn to participate in an activity know as “Cubing.” Cubing helps students understand the stories that have been read aloud to them on a much deeper level through a thorough examination of the facts. Below is an example of the kinds of answers the teacher might expect from the small group participants after the above story has been read as well as a step-by-step procedure for the activity.
Step 1. Choose a topic, in this case the topic would be the story, “The Pot That Juan Built.”
Step 2. Divide the class into six small groups. Each group will examine their assigned part of the “cube.”  The possibilities include: Describe, Compare, Associate, Analyze, Apply or Argue.
Step 3. Students brainstorm about their topic and write/illustrate their ideas on one sheet of paper provided for the purpose.
Step 4. Students then share their findings with the larger class and may also attach these to a six-sided box or also to bulletin board with six columns displaying their research.
An Answer Key Example
Describe: Juan Quezada was born in Mexico in 1940. When he was year old, his family moved to a village called Mata Ortiz. It is in this village that Juan makes his famous pots.
Compare: Juan loves to create beautiful and useful things just like the native people that used to live in Mata Ortiz six hundred years ago. He digs up his clay from the same ground just as the Casas Grandes native peoples did. He makes paint out of the local minerals: black manganese and red oxide just as the natives used to do. He even makes his paintbrushes from his daughter’s hair in the very same way that the ancient tribal people did when they were alive in Mata Ortiz!
Associate: Juan Quezada is a lot like us. He loves to make pottery out of clay and so do we.
Analyze: Juan Quezada used to be very poor and so were the people in his village before he taught them to make pottery. We can learn to be successful like Juan if we are willing to work hard and take care of the people around us in our school.
Apply: Making pottery is fun and many people love to use the pottery to decorate their homes with. If we work hard, we can learn many interesting, artistic activities at school. We can also use many of the same found materials that Juan discovered in the environment without spending money or throwing away useful materials.
Argue: Juan was very inventive. He helped his entire village make money so that they could feed their children and build them nicer schools. Juan was very curious and learned how to use things from his environment to save money. Juan appreciated the history of those people who lived 600 hundred years before he did. He learned the important things that they knew in order to survive and to help others survive as well.
Step-by-Step Studio Activity Specifics:
  1. The teacher will review the clay vocabulary after showing the Power Point about slab building to the students on the second day.
  2. Students will each be given a burlap mat to keep the clay from sticking on their tabletops.
  3. Shallow pans of water will also be placed at each table as well.
  4. Students will role with their palms only, the lump of clay and compress each four-inch ball without flattening the clay. This helps force air pockets from the clay. (do this for approximately 2 minutes)
  5. Then students will divide their clay in half and press out one of the large balls into a pancake shape that will form the dress or shirt and shorts of their clay person.
  6. Students will then divide their second large lump in half and use one piece for the head.
  7. The remaining lump of clay should be divided into four lumps and rolled out for arms and legs.
  8. The teacher should demonstrate to his or her students how to score the clay with a pencil and then add tiny drops of water to the scored surface, pressing the attached body parts with the palms of their hands spread flat against the clay joints.
  9. After the figures are formed these will need to dry for 24 hours, then be slowly fired in a kiln on low from four to six hours, on medium from four to six hours, and then on high for another additional four to six hours. Place a cone in the timer before turning on the kiln in order to ensure that the kiln will turn itself off before exceeding the highest temperature.
  10. After properly firing the clay figures paint these with glazes. Layer the glazes at least three times for each color choice in order to achieve a nice, evenly coated surface.
  11. Fire the figures again appropriately.
Special Needs Adaptations:
Modifications for the hard-of-hearing or deaf student:
  • Student will be seated closer to instructor so they will be better equipped to hear instructions or read lips
  • Student will be provided with written instructions so that they read about the discussions and demonstrations
  • The instructor may use a amplification devise provided by the school or student’s parents
Modifications for the student with limited vision or blindness:
  • Students will be allowed to observe samples of art projects with their hands and for extended periods of time
  • Students will be provided with safe tools and one-on-one guidance during a demonstration of the project
  • The project may be slightly adjusted to accommodate the student’s limitations or for safety reasons
  • Student will be given ample time to exist classroom before large crowds gather outside of the classroom.
Modifications for students with mild brain injury:
  • Students will be provided with duplicate instructions for home and school. Student will not need to remember to carry home materials to review.
  • Students will be given ample time to exist classroom with a pre-determined aid or peer before the official end of a class.
  • Instructor will provide for parent e-mail communication concerning the progress and needs of their student.
  • Student may be given special seat assignment in order to enable his participation in class appropriately. Specific peers may be better equipped to articulate projects visually for this student.
Health & Safety Concerns: There are no health and safety concerns for this project.
Cleanup Time & Strategy: Students will be instructed to put away art materials neatly in their containers, clean off their tables, and recycle their trash two minutes prior to dismissal.
Assessment: Fill out the formal scoring guide developed by the your school district according to age appropriate standards.
  
Lesson Plan and artwork photo copyrighted 2011 by Grimm

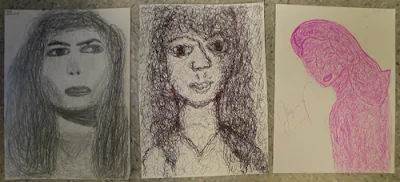
scribble portraits lesson plan


 Student samples of scribble portraits above.

Title: A Scribble Portrait Drawing Exercise
Topic: gesture drawing exercises, working with ballpoint pens
Goals:
  • Students will demonstrate a gestural technique called scribble drawing with paper and a ballpoint pen.
  • Students will draw a portrait of one of their peers from life.
  • Students will identify negative and positive space, texture, and a range of values in their drawing through the representation of these concepts in their drawing.
GLEs:
STRAND II: Elements and Principles (EP)
1. Select and use elements of art for their effect in communicating ideas through artwork
D. Texture: High School Level I
·      Identify and use real, invented and simulated textures
STRAND II: Elements and Principles (EP)
1. Select and use elements of art for their effect in communicating ideas through artwork
F.  Value: High School Level I
·      Identify and use a range of values to create the illusion of simple forms (including highlights and cast shadows)
STRAND II: Elements and Principles (EP)
1. Select and use elements of art for their effect in communicating ideas through artwork
G. Space: High School Level I
·      Identify and use positive and negative space in two-dimensional work
·      Identify and use perspective techniques to create the illusion of space (one-point linear perspective, overlapping, and change of size, detail, placement, value contrast)
STRAND II: Elements and Principles (EP)
2. Select and use principles of art for their effect in communicating ideas through artwork
D. Rhythm/Repetition: High School Level I
·      Identify and use elements to create regular rhythm
STRAND II: Elements and Principles (EP)
2. Select and use principles of art for their effect in communicating ideas through artwork
F. Proportion: High School Level I
·      Identify and use realistic facial proportions
Grade: 9th – 12th
Length of Class Period: 55 minutes
Frequency of Class Period: five days a week
Time Needed: one class period
Facility & Equipment Requirements:
  • One computer lap top
  • Room with good lighting
  • Large tables, approximately ten, each seating four students
  • Two sinks
  • Dry erase board
  • Drying racks
  • Cabinets for storage
  • Projector for viewing computer video, CDs and DVDs
Resources Needed Per Student:
    1. Power Point Introducing Scribble Drawing
    2. "Art school how to paint and draw" by Hazel Harrison

Materials Per Student:
·      Black or blue ball point pen
·      One sheet of white drawing paper
Vocabulary/Terminology:
·      “Scribble Drawing - Students can learn to build up tones and forms in a looser, less-organized way, by scribbling with the pen. This is a harder technique to handle than cross-hatching because it is random. You must learn to let the pen do the work for you. The technique of scribble drawing was first used by Picasso, when in revolt against traditional methods, and can give a dynamic quality to a drawing.” Harrison
Motivation- Looking and Talking Activity: Approximately ten minutes of gesture drawing will be practiced at the beginning of class then students will view a brief introduction to scribble drawing as this alternative gesture drawing activity is explained.
Step-by-Step Studio Activity Specifics:
  1. Students will be handed newsprint at the beginning of the class period to practice gestural drawing. They have been doing this activity for the last two days.
  2. Students will view and discuss with the teacher the concept of scribble drawing.
  3. Students will then be provided with nice drawing paper and ballpoint pens.
  4. Students will then be asked to practice the new gestural drawing technique while observing a partner directly in front of them.
  5. Students will draw using the scribble technique for approximately 45 minutes.
  6. Students will return their drawing pens and hand in their portrait exercises at the front of the classroom.
  7. Students will be dismissed by the bell.
Health & Safety Concerns: There are no health and safety concerns for this project.
Special Needs Adaptations:
Modifications for the hard-of-hearing or deaf student:
  • Student will be seated closer to instructor so they will be better equipped to hear instructions or read lips
  • Student will be provided with written instructions so that they read about the discussions and demonstrations
  • The instructor may use a amplification devise provided by the school or student’s parents
Cleanup Time & Strategy: Students will be instructed to put away art materials neatly in their containers, clean off their tables, and recycle their trash two minutes prior to dismissal.
Assessment: The assessment of this assignment is informal because it is an exercise used to develop student’s skills in gestural concepts. The cooperating teacher may choose to assign points to the exercise after completion.
All images and text copyrighted 2011, Grimm

Tuesday, March 22, 2011

gustav klimt trees lesson plan

student version of the art project

Title: Gustav Klimt Trees
Topic: drawing, Art Nouveau movement, patterns and shapes
Goals and Objectives:
  • Students will develop patterns to fill both positive and negative space in their drawing.
  • Students will identify three art movements: Realism, Fauvism and Art Nouveau.
  • Students will identify characteristics of landscape painting.
  • Students will identify characteristics of three art movements: Realism, Fauvism and Art Nouveau.
  • Students will cover all the white space of their drawing paper with bright colored magic marker ink, then layer on top of these drawings with metallic colored inks using geometric shapes and rhythmic patterns.
GLEs:
Strand I: Product/Performance for Drawing
A.1. Select and apply two-dimensional media, techniques, and processes to communicate ideas and solve challenging visual art problems.
Grade 3 - Layer two or more colors using crayon, colored pencil, or oil pastel
Strand II: Elements and Principles – Rhythm/Repetition
D. 2. Select and use principles of art for their effect in communicating ideas through artwork.
Grade 2 - Identify and create a complex pattern
Strand II: Elements and Principles – Line
A.1. Select and use elements of art for their effect in communicating ideas through artwork.
Grade 2 - Identify and use zigzag, dotted, and wavy lines
Grade 3 - Identify and use horizontal, vertical, and diagonal lines
Strand V: Historical and Cultural Contexts That Describe Characteristics of Artworks
B.1. Compare and contrast artworks from different historical time periods and/or cultures
Grade 2 - Compare and contrast two artworks on: Subject matter, Media, Use of line, color, shape, and texture, Theme, Purpose of art in culture
Grade 3 - Compare and contrast two artworks on: Subject matter, Media, Use of line, color, shape, and texture, Theme, Purpose of art in culture, Place
Strand III: Artistic Perceptions About Art Criticism
A.2. Analyze and evaluate art using art vocabulary.
Grade 2 - Explain different responses you have to different artworks
Grade 3 - Compare different responses students may have to the same artwork
Strand III: Artistic Perceptions About Art Criticism
A.2. Analyze and evaluate art using art vocabulary.
Grade 2 - Identify the following in artworks: Geometric shapes, Geometric forms, Foreground and background, Real textures, Contrast/ variety of colors
Grade 3 - Identify the following in artworks: Warm and Cool Colors, Symmetrical Balance, Invented textures, Horizontal, Diagonal, and vertical lines, Contrast/ variety of sizes
Grade: 2nd and 3rd
Length of Class Period: 55 min.
Frequency of Class Period: once a week
Time Needed: two class periods
Facility & Equipment Requirements:
  • One computer lap top
  • Room with good lighting
  • Large tables, approximately ten, each seating four students
  • Two sinks
  • Dry erase board
  • Drying racks
  • Cabinets for storage
  • Projector for viewing computer video, CDs and DVDs
Resources Needed:
  • Power Point about landscape painters
  • Landscape Data Chart
  • Three large poster of the following: “The Turning Road,” by Andre Derain, “The River Donets Near Suhodol” by Lyhonosov Vladimir, and “Expectation and Fullfilment” by Gustav Klimt
Materials Per Student:
  • A wide variety of colorful magic markers
  • Gold and silver markers
  • White drawing paper
Vocabulary/Terminology:
  1. Fauvism – An early-20th-century movement in painting begun by a group of French artists and marked by the use of bold, often distorted forms and vivid colors.
  2. Realism – The representation in art or literature of objects, actions, or social conditions as they actually are, without idealization or presentation in abstract form.
  3. Art Nouveau - A style of decoration and architecture of the late 19th and early 20th centuries, characterized particularly by the depiction of leaves and flowers in flowing, sinuous lines.
  4. Landscape - An expanse of scenery that can be seen in a single view
  5. Pattern – an artistic decorative design with repeating elements
  6. Line – A thin continuous mark, as that made by a pen, pencil, or brush applied to a surface.
  7. Positive Space – in art, is the space depicting the actual subject or image.
  8. Negative Space – in art, is the space around and between the subject(s) of an image.
  9. Data Chart – grids that students make and use to organize information about a given topic
  10. Art Movement - a group of artists who agree on general principles
Motivation- Looking and Talking Activity: Students will first view the Power Point about landscapes and then fill out a Data Chart. During the slide presentation I review vocabulary and add these words to a “word wall” for young students to clearly see. The students will need to look at the vocabulary while filling out their data charts during small group discussions.
Step-by-Step Studio Activity Specifics:
  1. Students will first view the Power Point about landscapes and then fill out a Data Chart along with the larger class. Each student is given their own chart to review and talk about in small groups and then the entire class fill out a similar chart together on the chalkboard.
  2. Students are then given white drawing paper and markers to design and color tree patterns within a landscape.
  3. Metallic markers are used to create the smaller, geometric patterning drawn on top of the bold tree drawings. Students will use these on a second day giving their colored marker drawings time to completely dry before applying the metallic inks.
Health & Safety Concerns: There are no health and safety concerns for this project.
Special Needs Adaptations:
Modifications for the hard-of-hearing or deaf student:
  • Student will be seated closer to instructor so they will be better equipped to hear instructions or read lips
  • Student will be provided with written instructions so that they read about the discussions and demonstrations
  • The instructor may use a amplification devise provided by the school or student’s parents
Modifications for the student with limited vision or blindness:
  • Students will be allowed to observe samples of art projects with their hands and for extended periods of time
  • Students will be provided with safe tools and one-on-one guidance during a demonstration of the project
  • The project may be slightly adjusted to accommodate the student’s limitations or for safety reasons
  • Student will be given ample time to exist classroom before large crowds gather outside of the classroom.
Modifications for students with mild brain injury:
  • Students will be provided with duplicate instructions for home and school. Student will not need to remember to carry home materials to review.
  • Students will be given ample time to exist classroom with a pre-determined aid or peer before the official end of a class.
  • Instructor will provide for parent e-mail communication concerning the progress and needs of their student.
  • Student may be given special seat assignment in order to enable his participation in class appropriately. Specific peers may be better equipped to articulate projects visually for this student.
Cleanup Time & Strategy: Students will be instructed to put away art materials neatly in their containers, clean off their tables, and recycle their trash two minutes prior to dismissal.
Assessment: Fill out the formal scoring guide developed by the your school district according to age appropriate standards.
(Sample data chart I made for this lesson. This above version is in color but the students may be given a black and white version to save money. There will be color versions of the sample landscapes posted at the front of the room during discussions.)