Friday, October 14, 2011

string a necklace made from seeds

The seed necklace above is from Mexico.

Brief Description: Stringing seeds to create jewelry and garlands is done by many different cultures of peoples. The seed necklace pictured here is from Mexico. However, native peoples in North America and many tribal peoples from Africa create similar crafts that also use the same methods. Seed necklaces are actually best strung while the seeds have not yet fully dried. This method makes it much easier for children to prick holes into the seed shells.


Supply List:
  •  A variety of seeds
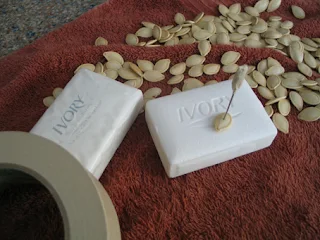
  •  strong thin cord or dental floss for stringing
  •  An embroidery needle with a sharp tip
  •  one bar of ivory soap
  •  a soft terry cloth towel
  •  masking tape
  •  one small pumpkin
  •  one large metal spoon
  •  access to a wash basin or a large bucket of water
  •  knife to cut open the pumpkin
  •  liquid dish soap
Directions:
  1. Cut your pumpkin in half and hollow out it's interior with a large metal spoon.
  2. The seeds are easy to clean. Just soak them for a few minutes in the bucket of water and the pumpkin pulp with separate from the seeds with a little plucking on your part.
  3. Wash the seeds with a little liquid soap and then pat them down with a soft terry cloth towel.
  4. Wrap the dull end of your embroidery needle with a little masking tape, so that it will be easier to handle.
  5. Pierce each soft, pumpkin seed with a threaded needle.
  6. Use a bar of Ivory soap underneath your needle to keep it sharp and to avoid contact with surfaces or flesh.

A fresh pumpkin will provide ample seeds for a necklace or garland.
The best way to prevent cuts and pricks is to use a bar of ivory soap
to buffer the entire process of piercing seeds. Ivory soap is best because
it contains fewer of the dyes and perfumes that little ones could
possibly be allergic to.
Emilie Lefler shows you how to make seed bombs.

Links to more projects that include the use of seeds:

craft a mosaic tea tray

Handmade mosaic tea tray with lovely scones.

Brief Description: These tea trays are perfect for serving up your favorite tea and scones. I recycled these 1950's ceramic tiles that I found inside of an old cabinet. It seemed a shame to throw them out. I am sure that these would be quite expensive if I were to purchase them today.

Supply List:
  • Selection of mosaic tiles, glass marbles, tiny mirrors, seashells
  • Cement grout
  • Elmer’s wood glue
  • Plastic-like gloves
  • Old damp rags or paper towels
  • Prefabricated wooden tea tray
  • white acrylic paint
  • bucket of clean water
  • soft paint brush
  • acrylic varnish sealer
Directions:
  1. Glue the tiles directly to the surface of the prefabricated wooden tea tray.
  2. Let the applied tiles dry over night to ensure that the glue has hardened. Do not check to see if the glued tiles have stuck to the surface permanently. Some of them will, some of them may only seem temporarily attached. The application of this step is necessary to help the tiles to stay in place before grouting them only.
  3. Mix the grout solution according to the directions on the label.
  4. Wear gloves if the label says that it is necessary.
  5. Gingerly apply the grout directly onto the surface of the tile work. Make sure that the grout does get pushed into as many of the cracks as possible. This is a bit messy.
  6. Wash your gloves thoroughly and you may put them back on or choose to remove them all together at this point. Be cautious about this removal however, some people do have mild skin allergies to grout and will develop a rash when coming in direct contact with it when its wet.
  7. Now your going to delicately wipe down the surface of your tiles with a damp rag or paper towel. You will be throwing these towels away. If you wish to rinse and squeeze out a sponge or towels as you work, keep an old bucket full of water for this procedure. Do not wash this contaminated water down a sink! Grout will collect in pipes and harden. You will need to pour this old water down a sewer pipe outside or simply find an area of your yard where you may dispose of it. Grout won't hurt an old leaf pile or the ground where plants are not growing.
  8. You want your project to look clean on the surface of the tiles when you are finished. The cracks between the tiles should also be completely filled with grout.
  9. Leave your mosaic project out over night to harden properly.
  10. If you see remaining grout on the surface of your tiles after it has hardened, you may go over the surface of these tiles with a light weight sand paper and damp sponge again.
  11.  With a soft brush wipe on gently a wash of white paint on the exposed wood and then seal it with a varnish.
I used old 1950 bathroom tiles to mosaic a 
prefabricated wooden tea tray.
A close-up of the period tiles.
More tea tray craft projects:

Follow in His Steps for Sunday School

Teachers can help their young students to make their very own "footstep" memory verse books. The selected verses should include scriptures that tell them specifically "how" to live life. children may use their own shoes to trace around for the front and back covers of the book. Include as many pages between the footstep covers as there are days in that particular unit of study. Sunday school teachers may also wish to write each verse as it is covered on the footprints of the bulletin board.

More links to similar themes in Sunday School bulletin boards:

My Offering Helps Who in Sunday School?

Sunday School teachers may cover a variety of themes during his or her lessons about offerings that may be explored during a month that is chosen to emphasize tithing. The poster covers: office supplies, missions, church staff, Sunday School supplies, church maintenance, and utilities.
Lesson plans that focus on specific mission projects, church staff appreciation and introductions to weekly tithing all teach young students the importance of caring for their own community.

More links to stewardship:

Flying High With God's Word for Sunday School Bulletin Boards

This traditional kite theme can be used to introduce March Bible verses. Each child can make their own kites during this month to attach ribbons with written verses on them. The sample verses are:
  • Love one another, as I have loved you. John 13:34
  • Teach me thy way O Lord. Psalm 27:11
  • For God so loved the world that he gave His only begotten Son. John 3:16
  • The Lord is my helper, and I will not fear. Hebrews 13:6
Kite templates and information from the web:

"He Cares For You" Sunday School Bulletin Board

Each child may draw and color his or her own picture of those people, places, or things that remind them of "how" God cares for people.

More links that cover this theme:

Thursday, October 13, 2011

Memory " Bee Hive" for Sunday School

Each child may make their own beehive booklet and include a Bible verse on each page. These verses should be discussed in terms of "how" the child may use them in real life situations with others. The children may also wish to illustrate them inside of their bee hive book. The Bible verses included on the bulletin board are as follows:
  1. Bee Gentle - II Timothy 2:24
  2. Bee Prayerful - Col. 4:2
  3. Bee Helpful - Gal. 5:13
  4. Bee Kind - Eph. 4:32
  5. Bee Honest - Rom. 13:13
    Templates of bee hives and bumble bees: