Wednesday, June 1, 2011

african masks from recycled materials: cardboard construction lesson plan

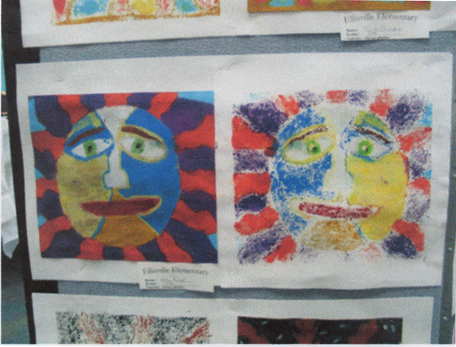
Teacher samples of masks built from cardboard and recycled construction papers, yarn, twine, wood scraps, newspapers, wheat paste and glue. The mask in the middle is almost finished! Far right, student example of the same mask project.
Title: African Masks From Recycled Materials: Flat Cardboard Construction
Topic: recycling, African culture
Goals and Objectives:
  • Students will make three-dimensional masks representing elements and principles of design used by African indigenous cultures.
  • Students will use recycled materials to construct an original mask.
  • Students will conduct research in the library or computer lab.
GLEs:
STRAND I: Product/Performance
3. Communicate ideas about subject matter and themes in artworks created for various purposes
A. High School Level I
  • Create original artworks using non-objective, architecture and anatomy subject matters.
STRAND IV: Interdisciplinary Connections (IC)
1. Explain connections between visual art and performing arts
A. High School Level I
  • Connect meanings of elements in art with terms in music, theatre, or dance
STRAND III: Artistic Perceptions (AP)
2. Analyze and evaluate art using art vocabulary
A. Art Criticism: High School Level I: With one artwork:
  • describe artwork;
  • analyze the use of elements and principles in the work;
  • Interpret the meaning of the work (subject, theme, symbolism, message communicated);
  • Judge the work from various perspectives:
  • Showing a real or idealized image of life (Imitationalism)
  • Expressing feelings (Emotionalism/ Expressionism)
  • Emphasis on elements and principles (Formalism)
  • Serving a purpose in the society or culture (Functionalism)
STRAND II: Elements and Principles (EP)
2. Select and use principles of art for their effect in communicating ideas through artwork
E. Unity: High School Level I
·      Explain how elements and principles create unity in artworks
STRAND II: Elements and Principles (EP)
2. Select and use principles of art for their effect in communicating ideas through artwork
F. Proportion: High School Level I
·      Identify and use realistic facial proportions
STRAND II: Elements and Principles (EP)
2. Select and use principles of art for their effect in communicating ideas through artwork
B. Emphasis: High School Level I
·      Identify and create emphasis (focal point) through contrast and convergence
Grade: 9th – 12th
Length of Class Period: 55 minutes
Frequency of Class Period: five days a week
Time Needed: six class periods
Facility & Equipment Requirements:
  • One computer lap top
  • Room with good lighting
  • Large tables, approximately ten, each seating four students
  • Two sinks
  • Dry erase board
  • Drying racks
  • Cabinets for storage
  • Projector for viewing computer video, CDs and DVDs
Resources Needed:
Materials Per Student:
  • Several large cardboard boxes
  • Scissors
  • Masking tape
  • Newsprint
  • Wheat paste
  • White glue
  • Acrylic paints
  • Paint brushes
  • Varnish or Modge-Podge (optional)
  • A variety of decorative recyclables like: beans, pods, plastic parts, wood chips, twine, feathers, construction paper, magazines etc...
Vocabulary/Terminology:
  • Indigenous - are ethnic groups that are defined as indigenous according to one of the various definitions of the term, there is no universally accepted definition but most of which carry connotations of being the "original inhabitants" of a territory.
  • Tribe - A tribe, viewed historically or developmentally, consists of a social group existing before the development of, or outside of, states.
  • Mask - a protective covering worn over the face
  • Culture - the tastes in art and manners that are favored by a social group
Motivation- Looking and Talking Activity: The students play with a set of art cards. They must practice looking at tribal design elements and sort the cards according to common attributes used by each particular group. I have included the identification chart below.
Step-by-Step Studio Activity Specifics:
  1. Students will play a quick, challenging card game that will introduce them to this lesson plan.
  2. Students will watch and discuss a Power Point about African tribal designs.
  3. Students will spend one class period doing research in the library about a particular tribe whose masks they wish to take design elements from.
  4. Students will draw two versions of a mask they wish to construct.
  5. Students need to decide if they will make a mask from flat recycled cardboard boxes or from crushed newsprint formed over an old milk jug.
  6. The teacher will demonstrate the cardboard construction techniques using glue and cut, geometric pieces of cardboard.
  7. Students will complete their project to this point and then the instructor will demonstrate the method of layering newsprint and wheat paste on top of the cardboard mask to improve its stability.
  8. The masks will need to dry over night.
  9. Then students will be provided a variety of recycled objects and asked to glue a selection to their masks in order to create texture: beans, pods, plastic parts, wood chips, twine, feathers, construction paper, magazines etc...
  10. Students will paste these objects creatively according to their design ideas.
  11. Students will then paint the mask and apply varnish or Mod Podge.
Health & Safety Concerns: There are no health and safety concerns for this project.
Cleanup Time & Strategy: Students will be instructed to put away art materials neatly in their containers, clean off their tables, and recycle their trash two minutes prior to dismissal.
Assessment: A formal assessment/grading rubric sheet is included along with this lesson plan in the student teacher binder.

all articles and lesson plans are copyrighted 2011 by Grimm

rockwood school district art exhibit, 2011

Here is Mrs. Pfeifer laughing as we work, she is
 the sweetest art teacher in the whole universe!
I gave up much of my flesh in order to hot glue these marvelous 
feathers and beads! Oh, and I suppose the students worked hard too.
The sun on the left was created with oil pastel and sandpaper. 
Then I helped the students print their sun image onto drawing paper with an iron.
Above and below are more colorful paintings made 
at Ellisville Elementary
And more paintings
These pumpkins and squash were drawn from real still lifes in 
Mrs. Pfeifer's classroom. Some of the students added a few fall trees 
and/or brick walls to enhance their art assignments.
The following artworks were by students from another school.
 I loved them so much that I photographed the displays for my records. 
I recognized this lesson from "The Great Clay Adventure," by Ellen Kong.
 I worked from this book during my internship with Mrs. Pfeifer.
I loved the use of the packing tape in this project! These shoes were 
made by middle school students I believe.
Art assignments that include architectural elements are very 
popular these days. I am noticing more of them in books, 
online, and in art classrooms that I visit.
This child did a marvelous study of Degas' Dancers!
I love the artworks done from this particular high school; 
these were very contemporary and fun.
These skeletons were made in a cultural project involving Latino Traditions.
 I have seen lesson plans based upon the subject but never have 
I seen such marvelous results from this topic in a local art classroom.
Very "dotty" but still a nice result for a simple lesson 
on complimentary colors.
This is cute "by George!" ... and a little strange.

all articles and lesson plans are copyrighted 2011 by Grimm

Tuesday, May 31, 2011

"starry night" lesson plan


(Above are student samples of the project)
Title: “Starry Night” It’s Elementary!
Topic: collage, art history
Goals and Objectives:
  • Students will use line to describe a cityscape.
  • Students will fill in areas of paper with solid marker.
  • Students will identify themes in music to themes in fine art.
  • Students will apply pressure to oil pastel to create different tones.
  • Students will identify and draw cityscapes.
GLEs:
Strand I: Product/Performance for Drawing
A.1. Select and apply two-dimensional media, techniques, and processes to communicate ideas and solve challenging visual art problems.
Grade K - Produce a line using crayon, pencil, or marker
Grade 1 - Fill an area with solid color/value using crayon, pencil, or marker
Grade 2 - Change pressure to create two values using crayon or pencil
Strand I: Product/Performance for Subject Matter: Functional Art
B. 3. Communicate ideas about subject matter and themes in artworks created for various purposes
Grade 2 - Design a building that serves a function in the community and includes building parts (e.g., roof, walls, door, windows, surface material)
Strand I: Product/Performance for Theme
C.3. Communicate ideas about subject matter and themes in artworks created for various purposes.
Grade 1 - Create original artwork that communicates ideas about the following themes:
· People (e.g., self, family, friends)
· Animals (e.g., pets, farm, zoo, wild)
· Things (e.g., toys, tools, food)
Grade 2 - Create an original artwork that communicates ideas about the following themes:
· Nature
· Places (e.g., school, home, stores, neighborhood, countryside)
Strand II: Elements and Principles – Line
A.1. Select and use elements of art for their effect in communicating ideas through artwork.
· Grade 1 - Identify and use straight, curved, thick, and thin lines
· Grade 2 - Identify and use zigzag, dotted, and wavy lines
Strand V: Historical and Cultural Contexts That Describe Characteristics of Artworks
B.1. Compare and contrast artworks from different historical time periods and/or cultures
· Grade 1 - Compare and contrast two artworks on: Subject matter, Use of line, color, and shape
· Grade 2 - Compare and contrast two artworks on: Subject matter, Media, Use of line, color, shape, and texture, Theme, Purpose of art in culture
Strand IV: Interdisciplinary Connections That Connect Visual and Performing Arts
A.1. Explain connections between visual art and performing arts.
· Grade 2 - Compare patterns in music to patterns in artworks
Grade: 1st and 2nd
Length of Class Period: 55 min.
Frequency of Class Period: once a week
Time Needed: three class periods
Facility & Equipment Requirements:
  • One computer lap top
  • Room with good lighting
  • Large tables, approximately ten, each seating four students
  • Two sinks
  • Dry erase board
  • Drying racks
  • Cabinets for storage
  • Projector for viewing computer video, CDs and DVDs
Resources Needed:
(My own "Starry Night" painted ten years ago.)
  • Power point about Vincent Van Gough
  • Youtube link to Don McClean’s song “Starry, Starry Night” http://www.youtube.com/watch?v=eJjNAn84hTM
  • Sample of prototype for the chalkboard/interactive whiteboard 
  • "Starry Night by Grimm" for discussion about artists who are influenced by Vincent Van Gough
Materials Per Student:
  • Grey, royal blue, and black construction papers (new full sized sheets)
  • Star stickers
  • A variety of oil pastels, one box per two students
  • White glue
  • Pencil and permanent black ink marker
Motivation- Looking and Talking Activity: I will share with the students a song written by Don McClean and a painting that I created based upon Van Gough's "Starry Night." We will discuss how artists influence each other.
Step-by-Step Studio Activity Specifics:
  1. Students will be introduced to Van Gough's painting of a village.
  2. Students will then discuss the similarities between artists who are influenced by "Starry Night."
  3. Students will then be asked to compare the similarities and differences between villages and cities.
  4. Students will be given black construction paper to cut out a silhouette of a city skyline. 
  5. Students will then use oil pastels to color windows in their cityscape.
  6. Students will glue down their silhouettes to a larger piece of purple or royal blue construction paper.
  7. Then they will add a sheet of grey paper to the bottom of their cityscape.
  8. Then students will add star stickers, color dashed lines in the night sky etc...
  9. Students will draw in pencil a busy street scene and outline this with black marker before coloring in their cars and people.
Special Needs Adaptations:
Modifications for the hard-of-hearing or deaf student:
  • Student will be seated closer to instructor so they will be better equipped to hear instructions or read lips
  • Student will be provided with written instructions so that they read about the discussions and demonstrations
  • The instructor may use a amplification devise provided by the school or student’s parents
Modifications for the student with limited vision or blindness:
  • Students will be allowed to observe samples of art projects with their hands and for extended periods of time
  • Students will be provided with safe tools and one-on-one guidance during a demonstration of the project
  • The project may be slightly adjusted to accommodate the student’s limitations or for safety reasons
  • Student will be given ample time to exist classroom before large crowds gather outside of the classroom.
Modifications for students with mild brain injury:
  • Students will be provided with duplicate instructions for home and school. Student will not need to remember to carry home materials to review.
  • Students will be given ample time to exist classroom with a pre-determined aid or peer before the official end of a class.
  • Instructor will provide for parent e-mail communication concerning the progress and needs of their student.
  • Student may be given special seat assignment in order to enable his participation in class appropriately. Specific peers may be better equipped to articulate projects visually for this student.
Health & Safety Concerns: There are no health and safety concerns for this project.
Cleanup Time & Strategy: Students will be instructed to put away art materials neatly in their containers, clean off their tables, and recycle their trash two minutes prior to dismissal.
Assessment: Fill out the formal scoring guide included below according to age appropriate standards.


all articles and lesson plans are copyrighted 2011 by Grimm

Monday, May 30, 2011

ceramic lesson plans: pinch pots with animal features


Drawing of simple pinch pot ideas.

Title: Ceramic Pinch Pots With Animal Features
Topic: learning to work with clay, sculpture
Goals & Objectives:
  • Students will model clay with control.
  • Students will build upon past knowledge in order to craft an original, three-dimensional artwork.
  • Through observation, investigation and discipline, students will create an art object demonstrating the use of the elements and principles of design.
  • Students will use ceramic vocabulary when referring to the processes of shaping clay objects.
GLEs:
Strand I: Product/Performance for Sculpture, Ceramics, Other Media
A.2. Select and apply three-dimensional media, techniques, and processes to communicate ideas and solve challenging visual art problems.
Grade K - Uses scissors with control, Modeling with clay or a similar material to create a sphere
Strand I: Product/Performance for Subject Matter: Functional Art
B. 3. Communicate ideas about subject matter and themes in artworks created for various purposes
Grade 3 - Create a container (e.g., paper box, clay pot, fiber basket)
Strand II: Elements and Principles – Shapes
B. 1. Select and use elements of art for their effect in communicating ideas through artwork.
Grade K - Identify and use shapes, Categorize shapes as large and small
Grade: kindergarten and 1st
Population: At Ellisville Elementary School there are approximately 110 first graders and 100 kindergarteners. 90% of these students are white and 50% of them are female. Approximately 5% of the students in both grades is African American and the remaining 5% is either Asian, Hispanic or Indian (from India).
Length of Class Period: 55 min.
Frequency of Class Period: once a week
Time Needed: two class period
Facility & Equipment Requirements:
  • One computer lap top
  • Room with good lighting
  • Large tables, approximately ten, each seating four students
  • Two sinks
  • Dry erase board
  • Drying racks
  • Cabinets for storage
  • Projector for viewing computer video, CDs and DVDs
  • Kiln for firing porcelain ceramic pinch pots
Resources Needed:
  • "Children of Clay: A Family of Pueblo Potters" by Rina Swentzell
  • Tips for beginning potters by Murry's Pottery. This video collection is appropriate for very young students. Murry shows basic techniques, child appropriate language, kind voice, secular presentations, excellent visuals and explanations. (15 videos) 
  • Video from theartproject by Chad Brown
  • Sample illustration for the chalkboard/interactive whiteboard at top of the page
Materials Per Student:
  • Both a large and small paint brush
  • A selection of glazes in egg carton, one carton per four students
  • A large container of water, one per four students
  • A paper towel
  • Amount of clay approximating the size of a tennis ball per student is used for the modeling of this object
  • A variety of clay printing and modeling tools (wood chips, shells, pencils, clay stamps, etc...)
  • Each student will need one burlap placemat to keep his/her working space clean and also to prevent clay from sticking to their counter space while he/she works
Vocabulary/Terminology:
  1. pinch - to form clay between the fingers and the palm
  2. coil - a rope-like formation of clay
  3. slab - a evenly rolled or pressed layer of clay
  4. bisque - is clay that has been fired but not yet glazed
  5. ceramics - are objects created from stoneware, porcelain or terra cotta
  6. clay - soil, water and sand
  7. fire - is the name for the heat that is used in a kiln
  8. glaze - a glass paint used on pottery
  9. kiln - a special oven used for hardening clay
  10. greenware - pottery that is not yet fired in a kiln
  11. leather hard - the hard condition of clay when it is almost air-dry
  12. score - roughen the clay's surface so that a bond may be formed between two surfaces
  13. sculpture - a three-dimensional art work
  14. slip - a liquid clay used to glue two pieces together
  15. texture - press into the clay surface with objects to create a pattern, design or rough surface
Motivation- Looking and Talking Activity: The teacher will demonstrate the process of first making a pinch pot and then adding on animal features.
Step-by-Step Studio Activity Specifics:
  1. Roll the moist clay ball between your palms.
  2. Use your thumbs to make a shallow dent no deeper than ½ inch into the clay ball.
  3. Remove your thumb and insert it again into the shallow hole slowly and push deeper into the clay ¼ inch.
  4. Remove your thumb and insert it again into the hole slowly pushing deeper into the clay approx. ¼ inch deeper.
  5. Remove your thumb.
  6. Hold the clay ball with your left hand if you are right-handed or with your right hand if your are left-handed.
  7. Insert your dominant hand’s thumb into the hole and wrap your four remaining fingers over the top of the clay ball. Keep these fingers together and pinch with your thumb on the inside of the hole towards your fingers. This will make the interior wall of the clay ball thinner as you gently turn the ball while pinching slowly. Teachers can demonstrate this movement also at this time by using a plastic, transparent cup to show students what they can only feel (not see) while pinching into clay. See photo just above Step-by-Step for reference.
  8. Once the hole is widen enough to fit both of your thumbs into it, switch to pinching with both hands simultaneously. Wrap both sets of four fingers around the clay ball and continue to pinch and turn until your ball looks more like a pot. (The teacher may refer to this step as “driving a car” for very young students.)
  9. Once the walls of the pot are an even thickness, (approx. ½ inch) shape the bottom of your pot by gently tapping it on your desktop to form a flat surface.
  10. Divide a second lump of clay into five equal parts. Use all of the clay up until it is gone.
  11. Roll all five lumps into five smooth balls.
  12. Turn pinch pot upside down.
  13. Scratch the bottom.
  14. Fill the scratches with drops of water.
  15. Press four of the five balls into the scratches to create four feet on the bottom of your pinch pot.
  16. Turn the pot right side up.
  17. Scratch the edge of the top.
  18. Fill the scratches with water droplets.
  19. Press the fifth ball into place where ever you wish the head to go.
  20. Form tail, ears, and any other features and then attach in the same way.
  21. Carve in facial features.
  22. Your teacher will fire the pot.
  23. Glaze three coats of every color in order to properly cover ceramic pots.
  24. Try not to apply glaze to the bottom surface edges of footed pots if it can be helped.
Special Needs Adaptations:
Modifications for the hard-of-hearing or deaf student:
  • Student will be seated closer to instructor so they will be better equipped to hear instructions or read lips
  • Student will be provided with written instructions so that they read about the discussions and demonstrations
  • The instructor may use a amplification devise provided by the school or student’s parents
Modifications for the student with limited vision or blindness:
  • Students will be allowed to observe samples of art projects with their hands and for extended periods of time
  • Students will be provided with safe tools and one-on-one guidance during a demonstration of the project
  • The project may be slightly adjusted to accommodate the student’s limitations or for safety reasons
  • Student will be given ample time to exist classroom before large crowds gather outside of the classroom.
Modifications for students with mild brain injury:
  • Students will be provided with duplicate instructions for home and school. Student will not need to remember to carry home materials to review.
  • Students will be given ample time to exist classroom with a pre-determined aid or peer before the official end of a class.
  • Instructor will provide for parent e-mail communication concerning the progress and needs of their student.
  • Student may be given special seat assignment in order to enable his participation in class appropriately. Specific peers may be better equipped to articulate projects visually for this student.
Health & Safety Concerns: There are no health and safety concerns for this project.
Cleanup Time & Strategy: Students will be instructed to put away art materials neatly in their containers, clean off their tables, and recycle their trash two minutes prior to dismissal.
Assessment: The informal assessment is made during class. The teacher watches the students closely during class and grades them for their participation, dexterity  and enthusiasm.


Student rolling out "legs" for her pinch pot animal.


pinch pots in kiln after firing
all articles and lesson plans are copyrighted 2011 by Grimm