Sunday, June 4, 2017

audubon's legacy lesson

Description: Audubon, a French-American ornithologist, hunter, and artist, developed his own methods for drawing birds. First, he killed them using fine shot. He then used wires to prop them into a natural position, unlike the common method of many ornithologists, who prepared and stuffed the specimens into a rigid pose. When working on a major specimen like an eagle, he would spend up to four 15-hour days, preparing, studying, and drawing it. His paintings of birds are set true-to-life in their natural habitat. He often portrayed them as if caught in motion, especially feeding or hunting. This was in stark contrast to the stiff representations of birds by his contemporaries, such as Alexander Wilson. Audubon based his paintings on his extensive field observations.
      He worked primarily with watercolor early on. He added colored chalk or pastel to add softness to feathers, especially those of owls and herons. He employed multiple layers of water-color, and sometimes used gouache. All species were drawn life size that accounts for the contorted poses of the larger birds as Audubon strove to fit them within the page size. Smaller species were usually placed on branches with berries, fruit, and flowers. He used several birds in a drawing to present all views of anatomy and wings. Larger birds were often placed in their ground habitat or perching on stumps. At times, as with woodpeckers, he combined several species on one page to offer contrasting features. He frequently depicted the birds' nests and eggs, and occasionally natural predators, such as snakes. He usually illustrated male and female variations, and sometimes juveniles. In later drawings, Audubon used assistants to render the habitat for him. Going beyond faithful renderings of anatomy, Audubon employed carefully constructed composition, drama, and slightly exaggerated poses to achieve artistic as well as scientific effects. Read more...


Subject: Fine Art/Biology

Instruction Time: Three sessions at least

Materials needed:
  • White drawing paper
  • Audubon prototype
  • Colored pencils and watercolors
Objective(s):
Show-Me Visual Art Standards for Missouri Schools
Strand I: Product/Performance – Select and apply two-dimensional media, techniques, and processes to communicate ideas and solve challenging visual art problems for all high school grades.
  • Select and apply drawing media and techniques that demonstrate both sensitivity and subtlety in use of media and informed decision making
Strand IV: Interdisciplinary Connections, Explain the connections between Visual Art and Communication Arts, Math, Science or Social Studies
  • Explain how historical events and social ideas are reflected in artworks from selected cultures or historical time periods.
Show-Me Standards for Biology
Strand 7: Scientific Inquiry – Science understanding is developed through the use of science process skills, scientific knowledge, scientific investigation, reasoning, and critical thinking
  • Concept B. Scientific inquiry relies upon gathering evidence from qualitative and quantitative observations. - Determine the appropriate tools and techniques to collect, analyze and interpret data.
Phase 1: Clarify goals and establish set
  • Students will study the watercolors and drawings of the famous orinthologist John James Audubon by observing a slide presentation, reading the attachment about him following this lesson plan and visiting web sites.
  • Students will copy prototypes of Audubon’s work and develop their skills in watercolors and colored pencils.
Phase 2: Demonstrate knowledge or skill
Task Analysis: rewrite below
  1. Students will research the life of Audubon through a selection of provided materials.
  2. Students will select a prototype of James Audubon.
  3. Make tracings or stencils to transfer the prototype to fine watercolor paper and paint.
Phase 3: Provide Guided Practice
  • The teacher will show a slide presentation of John James Audubon’s life.
  • The teacher will assign to each student a prototype to work from.
  • The teacher will demonstrate methods of watercolor and drawing to the class during the sessions.
Phase 4: Check for understanding and provide feedback – A standardized rubric will be used to analyze and critique each individual student’s artwork.

Phase 5: Provide extended practice and transfer – Students will be encouraged to create even more projects at home. Materials used during class and the research conducted on their own computers at home may be duplicated in their own home environment at very little expense.

Reflections: Reflections are attached to rubric. There is room enough for both the instructor and student to respond. Copies of reflections are returned to students to keep in their three ring binders. (phase 4 above)

Resources: The lesson plan adaptations and written content, excluding State Standards, is written and copyrighted by Kathy Grimm, 2009. The use of the ideas and 10% or less content constraint on previously published materials is met in accordance to United States copyright law. Some scientific definitions come from public domain resources. Interested parties may visit the following link to read about Fair Use and Teachers http://home.earthlink.net/~cnew/research.htm#Purpose%20of%20use

Saturday, May 27, 2017

posters and bulletin boards in the classroom

Posters and Bulletin Boards in The Classroom by Kate Coplan

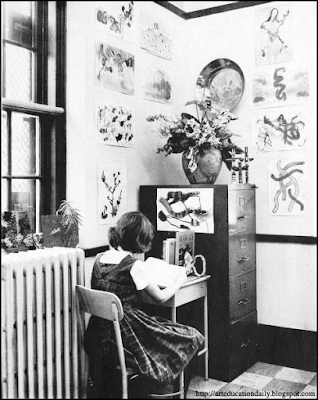
To improve the appearance of an unattractive corner of a
Fifth Grade classroom in Baltimore, the teacher mounted
some children's art papers on walls and cabinets, placing
artistic objects nearby. With the colors nicely coordinated,
the arrangement made a pleasant reading corner.
       There are two major views in so far as classroom bulletin boards are concerned. One maintains that they must be showcases for students' work, with the youngsters themselves largely responsible for both content and presentation. The use by the teacher of posters and designs suggested or originating elsewhere is frowned upon, even though this might mean a vastly improved representation.
       The second view‚ with which this writer is in hearty accord‚ argues that the teacher, because of his broad experience and training, should provide most of the ideas and leadership, democratically inviting student participation, and using student work wherever practicable.
       However, if he is by talent or temperament artistically inadequate, he may legitimately borrow ideas, materials and/or techniques from any available source, in order to make classroom bulletin boards brighter, more attractive, more potentially educative. Certainly it is not plagiarism, but justifiable resourcefulness to adopt existing tools tending to stimulate learning, or to assist more readily in the dissemination of information.
       Where would the world be today if the great scientists, inventors, explorers, historians and medical researchers had ignored earlier developments in their respective fields, or failed to take into account the findings and accomplishments of their predecessors and contemporaries? Surely in teaching, as in other areas, there is the obligation to seize upon any constructive means likely to further the desired goals.
       James B. League, an enthusiastic and capable young teacher in Baltimore's elementary schools, has created many successful classroom bulletin board displays. Out of his experience he has evolved the following philosophy:
       "In order to proceed with maximum understanding it seems necessary to outline certain objectives or goals to be desired of visual materials. Without this statement, one flounders in confusion. The statement of objectives is also necessary from the point of view of establishing sub-goals to be used as means of arriving at the final goals. All material included in this statement is developed from my own classroom teaching experience, and is stated from my personal viewpoint only.

Objectives:
  • To create the maximum aesthetic 'value' with the abilities and materials available to each teacher
  • To create visual displays that have mind-appeal as well as eye-appeal
  • To provide high standards of visual display to serve as a basis of experience for children to develop their own background and eventually their own skills in this area
  • To develop the teacher's outlook to a point where he is sensitive to many ideas as potential points of departure for display or visual set-ups 
  • To remember that fundamentally visual material should be, after all, an integral part of the educative processes, and therefore a primary responsibility of the teacher, himself
       "The following list of points serves to establish some reasons why it can be argued that the teacher needs to take the dominant role in planning, preparation, and execution of visual materials. (This is counter to the position that children should perform this function, and the teacher take a rather subordinate role, because schools are more interested in developing healthy personalities than beautiful art products).

   1. The preparation of quality displays requires a perception and/or appreciation of several factors, among which are:
  •  a. an intellectual awareness of the salient points of the topic or subject to be displayed . . . i.e., how to create and capitalize on clever captions and related materials such as pictures, books, mock-ups, etc.
  •  a sensitivity to certain principles of color and design as adjuncts of the message to be conveyed
  • the ability to gauge the viewers' reaction- e.g., appropriate materials for age and/or mentality groups
   2. The final display should be more than a sum of its parts (i.e., color, design, caption, etc.). Rather, it should possess an organic unity which is the end product of intelligent planning
   3. The display should have 'sales' value as well as aesthetic value. It is the teacher who understands fully the message (however subtle or bold) he wishes to have communicated by the display materials
    4. In the final analysis, it is the teacher who must grow in experience and skill in the development of effective displays. He will need to use these skills at a high level of efficiency for many years to come. The sense of design, and 'healthy personality' can be developed in children in countless other ways
   5. The teacher, himself, needs to develop a forward look to keep his displays stimulating, and at the aforementioned high level of efficiency of execution

       "Certainly I do not advocate leaving the children out of the picture. That is not my intention at all. I should like to make these additional points, and a more resourceful teacher could probably come up with many others:

       1. In order to help the children to develop good display principles, one bulletin board in the room can be turned over to them. This could be done on a monthly rotating committee basis, four or five boys and girls working together. Such a setup would give all the children experience during the year in the planning and execution of exhibits. Being responsible for a single board, and knowing what was expected of them, they would probably feel more secure
       2. Because the teacher, in a sense, takes the dominant role, does not mean that the children are excluded during the preparation and execution activities. They could be included in various ways:
  • Designing and cutting letters from folded squares of construction paper, if no commercial alphabets are available 
  • Dismantling previous displays 
  • Preparing the backgrounds for new displays, by painting or lining
  • Helping in choice of pictures in planning stage
  • Assisting with mounting of pictures, maps, charts or other items
  • Getting books from library when these are to be used
  • Putting jackets on books
  • Filing dismantled materials for future use
  • Lending material from their personal collections: shells, stamps, baseball cards, rock specimens, etc.
       3. Children, quite naturally from a maturational point of view, lack the sensitivity and intellectual awareness to prepare displays with the necessary depth of understanding to carry a teaching message effectively
       4. Finally, children themselves love to see their own creative products displayed to best advantage"

Sample Bulletin Boards from Suburban Baltimore Schools: (coming soon)
  • Bulletin Board Displays from Kindergarten Classrooms
  • American History Bulletin Boards
  • Science and Math Related Ideas for Bulletin Boards
  • Ideas for Sharing Books through Bulletin Board Displays 
  • Bulletin Board Ideas About Religion
More Articles by Kate Coplan:
  • How to Communicate Through Visual Display
  • About The Use of Color In Bulletin Boards
  • Creative Poster Ideas
  • Attention-Getting Bulletin Boards
  • Helpful Hints About Crafting Displays
  • Taking Care of Display Materials

Monday, April 10, 2017

sculpt a few tacos with papier-mâché

Finished papier-mâché pulp taco samples.
 
Brief Description: These tacos look good enough to eat. Save some clean tissues and bags from your real dinner some evening and wrap these up realistically for a little one to enjoy as a gift.

Supply List:
  • sturdy paper plates
  • newsprint
  • brown paper bag
  • masking tape
  • white school glue
  • red and brown acrylic paint
  • soft, small paint brush
  • papier-mâché pulp
  • shredded yellow and green papers 
  • Mod Podge
Directions:
  1. Cut off the rim of the number of plates you will need to make a handful of mouth watering tacos. 
  2. Crush some newsprint to sandwich between your faux shells and tape these in place.
  3. Now layer shredded brown paper along with white school glue all over the surface of your taco shapes. Cover the surface completely. Always end with the surface being covered with the white glue. Set aside the taco shapes to dry overnight.
  4.  Now prep the papier-mâché pulp according to the directions on the package. Spread it over the inside surface of the taco only to imitate the ground beef. Let this dry out; it must harden completely before continuing with the project.
  5. Paint  papier-mâché pulp brown for ground beef and red for sliced tomatoes. Let dry.
  6. Paste shredded paper to mimic shredded cheese and lettuce.
  7. Add a layer of Mod Podge to the entire surface of all tacos to preserve the work.
Left, tacos start out looking something like this, but, Right, in the end look more like something you could eat.
Cute fake food crafts from GuideCentral.

Wednesday, April 5, 2017

Construct a Cardboard Box Loom for A Child

The box construction allows small arms, hands, and fingers to manipulate yarn in
  and out of the warp twine in an easy fashion. When I was very young, perhaps in
 first grade, my teacher gave us box looms to practice weaving with. Because
weaving projects with yarn are now taught in 5th grade and paper weaving in first
 grade, teachers no longer construct box looms for young ones to practice
with in public school.

Brief Description: Teach your little one how to weave with a cardboard box loom. They can play with it and weave soft, colorful yarns in and out of the sturdy twine, over and over. This is a wonderful way to develop their small motor skills. This loom is used for teaching only, so it is not necessary to tie off the yarns or dismantle the warp twine threads, therefore I tie the warp all the way around the box (a sturdy wrap). The child will also need to unwrap the weave in order to start again and this is good. Unweaving is just as important as the weaving because it trains the child's fingers. Make and unmake over and over, just as you would do when practicing with sewing cards.

Supply List:
  • a very sturdy, shallow cardboard box
  • box cutter
  • sturdy twine
  • many colors and textures of yarn
Directions:
  1. Measure and notch with consistency, the narrow end of a sturdy shallow box for your warp twine. 
  2. Wrap the twine, using even tension all the way around the box through each notch to create your warp threads. Tie it off at the back of the box.
  3. Now a little person can practice their weaving using some soft, thick yarn. After they have finished practicing, have them remove the yarn from the warp, roll it into a ball and store it inside the box loom behind the warp threads.  
Additional Tips: Resist eliminating the steps when teaching little ones an activity. It is very important for children to learn processes in art. This trains their thinking, their perseverance and their hands. What may seem like busy work on the surface is actually a necessary part of their development. Just as it takes hours, days, weeks and years for an athlete to learn how to play at sports, so does it take the same industry to learn how to accomplish great things in art.
      Children today definitely lack the patience and fortitude that they once had in the countless generations of students born prior to our century. In part this has much to do with the immediate gratification people experience through modern conveniences. However, if you persist in teaching your children patience and dedication to quite activities such as these: their abilities to self sooth, wait with a quiet and calm spirit, and create with understanding and genuine curiosity will improve
.

Left, I'm prepping a sturdy piece of wood on the left for notching. You can make a loom like a
 cardboard one in the video below out of thin plywood. Right, you can see that here I have
 notched a stiff piece of card board and wrapped my warp threads to the front of the loom
 only. This is because I intend to remove and use the weave.

       When your child is ready to weave something worthy of keeping, you will need to construct a cardboard loom and wrap the warp around the notches to the front. You can learn how to make a cardboard loom by watching the video below. This loom will enable the young weaver to remove and keep their work.
      Advanced loom weavers graduate to working with a loom built out of wood and nails. Professionals then may purchase a loom for perfect results!

More Related Content:

Cover a Letter Box With Postage Stamps

I gifted a few letters to a daughter, sealed
inside a wooden decoupaged purse.
Brief Description: So cute and so chick, this wooden purse is actually a letter box for all of those handwritten messages you'd like to keep for sentimental reasons. I decoupaged my letter box with stamps and gave it as a gift to a certain someone that I knew collected old letters.

Supply List:
  • Mod Podge
  • soft bristle brush
  • 3D alphabet stickers
  • real stamps and or sheet of stamps for collage work only 
  • wooden box shape (I chose a purse with a bamboo handle and brass latch.)
  • tacky white glue
Directions:
  1. First make sure the surface of the wooden box you intend to decorate is free from dust and dirt and dry if you wipe it down with a damp cloth.
  2. Apply a generous but not messy coat of Mod Podge to a small area of the box and layer stamps onto it in a way that seems pleasing to you. 
  3. let this area dry a little to the touch and then brush a coat of Mod Podge over the top of the stamps. Now repeat this step over until the entire wooden box has been covered. Dray overnight.
  4. Use a tacky white glue to apply 3 dimensional alphabet stickers to the front. Spell out the recipient's name if you like.
More postage stamp crafts:
How It's Made - postage stamps

Weave The Ojo De Dios

The traditional Ojo De Dios craft. Left, backside of the weaving,
Right front side of the weaving.

Brief Description: A god's eye is a yarn weaving and a spiritual object. The Ojo de Dios (Eye of God in Spanish) is woven with yarn and wood, often with several colors. The weaving of an Ojo de Dios is an ancient contemplative and spiritual practice for many indigenous peoples in the Americas, and beliefs surrounding them vary with location and history. Some people believe they were originally part of the religion of the Ancient Pueblo Peoples. Read more...
      This is a popular, inexpensive Native American craft. It is often taught at summer camps, scout meetings and sometimes in schools. 

Supply List: Students will need yarn of any color, scissors, 2 sticks of equal length and masking tape to make this vintage craft.

Step-by-Step Directions:

  1. Tape the center of two sticks together in both directions to secure your twigs into an X shape.
  2. Tie the end of your yarn piece off at the center of your crossing sticks.
  3. Wrap yarn over and under between each stick, working your way around and around until the god's eye is finished to the size you want. 
  4. Add tassels if you like by wrapping yarn around a piece of cardboard many times. Remove the card and tie off the strands together twice. Clip the ends to form the tassel. Watch video here.
Look at the weave steps up close.


For more classroom friendly videos
 visit SophiesWorldVideo.

Apply a Faux Metal Finish to An Egg

Brief Description: High school kids might enjoy this egg decorating project. It is certainly a bit more complicated than most Easter egg crafts. However, if you enjoy this one, you may like to try even more of my egg decorating crafts here.
My egg sample showing a faux metal
 finish technique.

Supply List:
  • a plastic egg
  • aluminum foil (The type you buy at a grocery store)
  • black acrylic paint
  • white glue
  • puff paint (any color)
  • masking tape
  • Mod Podge 
  • soft cloth or tissue
Directions:
  1. First cover the surface of the entire plastic egg with masking tape until none of the surface is left bare.
  2. Use you puff paint to draw a swirl pattern around the entire egg. Let parts of the design dry as you proceed. 
  3. Once you are finished and the surface is completely dry, this could take some time, apply the white glue to areas of the egg while applying the aluminum foil. Take care not to rip the foil and do not layer more than one sheet. 
  4. Use your finger tips to press the foil down into the surfaces of your design over and over until you are satisfied with the overall effect. 
  5. Now let the egg dry completely and then brush a watery layer of black acrylic paint onto the egg's surface.
  6. Wipe away the paint with a soft cloth or tissue so that the raised areas made by the puff paints are shinier than the crevices of the design. Let the egg dry.
  7. Apply Mod Podge to the finished surface when done.
 An alternative faux metal technique from Aleene.